 This was what my nails looked like on Valentines Day this year. I was too lazy to manually draw hearts so I went with these nail art stickers I found in Bangkok. I can’t remember the exact price, but I’m guessing they were around 20 Baht each. I bought a bunch of them from a vendor on the street the last time we were there. I really like these stickers, despite the fact that they’re totally a rip-off of the Comme De Garçons logo.
Category Archives: Nail art
Nail art : Dotty red
 I was digging through my laptop the other day and I found a nail art folder where I have at least 10 pictures of different nail art designs which I forgot to post. I’ll probably be posting them within the next few days (unless I forget again).
This was my nail art last New Year’s Eve. I tried to do my nails so that they would match MY DRESS. I think I did a pretty good job. I put the glitters on because I thought it looked too plain by itself.
Nail Art : Purple Confetti

My nails a few months back. I found the photos while I was organizing my files the other day. I used Sally Hansen’s Rock Bottom as the base, and Sinful Colors’ Frenzy for the smaller glitters. The bigger glitters were from Bobbie’s new Confetti polish.
I spotted these glitter polishes from Bobbie a while ago and I decided to try them out. I think they come in 4 colors, but I decided to only get these two. They cost twice as much as regular drugstore polishes, but they’re still very affordable at 60PHP.
I’ve tried both of them already and I think like the purple one more since it adds a bright pop of color to my nails. I really enjoy how festive they make my nails look, but I don’t use them too often because they require a bit of work to apply (and remove). The glitters are super chunky so it’s hard to get the right amount on your nails with just one swipe. I had to resort to dabbing the nail polish on so I can get the glitter to transfer. I also had to move the bigger pieces of glitter around using a toothpick so they would be distributed evenly on my nails. Since I had to use several coats to get the look I wanted, it took longer for my nails to dry. And, just like all other glitter polishes, this was a pain to remove. Even with the soaked cotton ball + aluminum foil technique, it took me about 20 minutes to get all the glitter off. But despite all this, I do think they are super gorgeous, and I’d be willing to go through all of that occasionally for some sparkly nails.
Nail Art : Lacy Lilac

My nails from a few months back. I realized that I have a bunch of nail art photos on my laptop that I haven’t posted. I’ll probably be spamming you with photos of my nails these coming weeks.
I bought these stickers from Malaysia a few years ago. I’m not sure what brand they are. All I know is they were very affordable, so I ended up buying a lot. For some reason I stashed them in a drawer as soon as I got home and forgot all about them. I think I was trying to save them for a special occasion, because back then, nail art stickers were expensive. Nowadays you can get them everywhere and for a really low price too.
For the base, I used a shimmery lilac polish from Etude House. And I added the black dots using my Sassy Nail Art Pens.
I loved these stickers. They look so classy, and they lasted pretty well. I had them on for two weeks before they started to peel.
Nail Art : Pinoy Pride
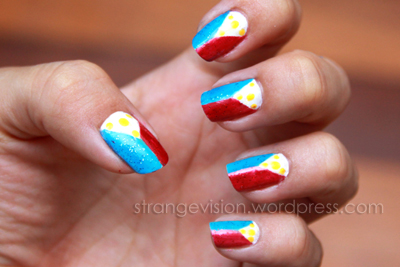
In honor of the Philippines’s 116th Independence Day 🙂
Embarrassed as I am to admit it, I had to double check online to see how I should orient the flag. I didn’t want to go around sporting a symbol of war on my nails. I know that when the flag is hung horizontally, the blue should always be on top, but I wasn’t too sure about the rules for hanging it vertically. A good tip I found online is to remember “R-R“, which stands for “Red = Right”.
This turned out a little messier than I wanted. I used tape to make the lines straight, but for some reason they still came out a bit wonky. I’m too lazy to redo them so I guess it will have to do. Maybe I’ll have better luck next year 🙂
Nail art : Easter Eggs

Festive nails for the holiday 🙂 I had to ask my sister for help with this one because I can’t draw straight lines on my own nails, not even with a striper. The last time I did something like this, I used scotch tape to guide me, but I didn’t want to go through all that this year. Luckily my sister was bored and was more than willing to help.
 She was especially crucial when it came to doing my left hand. There’s no way I would have been able to do this without her help. Thanks Ez! (I did the same designs for both hands, but I reshuffled them a bit )
Previous Easter nail art designs:
Nail Art : Glittery red tips

For this design I used these three nail polishes:

Chic’s Love Orchid, Sally Hansen’s Lady Luck (Gem Crush) and Wet and Wild’s The Gold and The Beautiful.
I applied two coats of Love Orchid before I started layering on Lady Luck, focusing on the tips. It took about 4 or 5 coats of Lady Luck to get the opaque reddish-pink color. Then I went over the entire nail with The Gold and The Beautiful.

Purrrty~
Nail art : Cupcakes

This was what my nails looked like at my sister’s engagement party. The dress I wore had these tiny, colorful cupcakes so I used that as inspiration for my nails. It’s a little hard to tell that they’re cupcakes in the photo above since they’re upside down, so here’s a better angle:

And here’s a shot with my cupcake dress in the background:

Nail art : Penshoppe dots
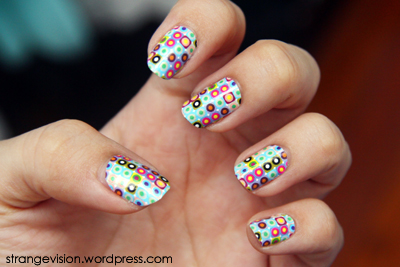
Another picture of my nails I forgot to post. This was taken around the second week of December. I used nail art stickers I found at a Penshoppe outlet in San Pablo.

It was only P39, can you believe it?
 Each pack comes with twelve stickers to fit different nail sizes.
Despite being really inexpensive, these stickers were actually pretty good. They lasted two weeks with minimal chipping/peeling, and they didn’t warp when I applied a clear topcoat over them. I wish I bought more, but there weren’t that many designs to choose from at the outlet we went to.
Nail art : Red for the new year

This was what my nails looked like on New Year’s Eve. My dress was red and it had white bows and polka dots so I thought about recreating the same design on my nails. But then I saw this pack of Etude House stickers in my drawer so I decided to just use them instead:

I borrowed some red nail polish from Ezra, put the stickers on and sealed everything with a layer of gold glitter polish. Unfortunately, these stickers didn’t last that long, which was a surprise because the regular Etude House stickers last a long time, and this was more expensive. Even with the glitter topcoat, the bows kept peeling off over the next few days. To make this design last for a week, I had to occasionally repaint the bows on using white nail polish.
